ffmpeg streaming over NS3 networks
read https://nqucsie.myqnapcloud.com/smallko/ns3/ns3-usebridge.htm first. I will use that topology to do ffmpeg streaming.
In that lab, we need to setup the network namespace manually. In this lab, we will use script to setup and teardown the network namespace.
netns-setup.sh
|
brctl addbr br-left brctl addbr br-right tunctl -t tap-left tunctl -t tap-right ifconfig tap-left up ifconfig tap-right up ifconfig br-left
up ifconfig br-right
up ip netns add net0 ip netns add net1 ip link add type veth ip link add type veth ip link set dev veth1 netns net0 ip netns exec net0 ip
link set dev veth1 name eth0 ip netns exec net0 ip
addr add 10.1.1.3/24 brd
+ dev eth0 ip netns exec net0 ifconfig eth0 up ip netns exec net0 ip
route add 10.1.2.0/24 via 10.1.1.2 ip netns exec net0 ip
route add 10.1.3.0/24 via 10.1.1.2 brctl addif br-left
tap-left brctl addif br-left
veth0 ip link set dev veth3 netns net1 ip netns exec net1 ip
link set dev veth3 name eth0 ip netns exec net1 ip
addr add 10.1.3.3/24 brd
+ dev eth0 ip netns exec net1 ifconfig eth0 up ip netns exec net1 ip
route add 10.1.2.0/24 via 10.1.3.2 ip netns exec net1 ip
route add 10.1.1.0/24 via 10.1.3.2 brctl addif br-right
tap-right brctl addif br-right
veth2 ifconfig veth0 up ifconfig veth2 up |
netns-teardown.sh
|
tunctl -d tap-left tunctl -d tap-right ip netns del net0 ip netns del net1 ifconfig br-left
down ifconfig br-right
down brctl delbr br-left brctl delbr br-right |
tap-usebridge.cc
|
/* -*- Mode:C++; c-file-style:"gnu"; indent-tabs-mode:nil;
-*- */ /* * This program is free software; you
can redistribute it and/or modify * it under the
terms of the GNU General Public License version 2 as * published by
the Free Software Foundation; * * This program is distributed in the
hope that it will be useful, * but WITHOUT
ANY WARRANTY; without even the implied warranty of * MERCHANTABILITY or FITNESS FOR A
PARTICULAR PURPOSE. See the * GNU General Public License for more
details. * * You should have received a copy of
the GNU General Public License * along with
this program; if not, write to the Free Software * Foundation, Inc., 59 Temple Place,
Suite 330, Boston, MA 02111-1307 USA */ // // This is an illustration of how one
could use virtualization techniques to // allow running applications on virtual
machines talking over simulated // networks. // // The actual steps required to configure
the virtual machines can be rather // involved, so we don't go into that
here. Please have a look at one
of // our HOWTOs on the nsnam
wiki for more details about how to get the // system confgured. For an example, have a look at
"HOWTO Use Linux // Containers to set up virtual
networks" which uses this code as an // example. // #include <iostream> #include <fstream> #include "ns3/core-module.h" #include "ns3/network-module.h" #include "ns3/csma-module.h" #include "ns3/tap-bridge-module.h" #include "ns3/error-model.h" #include "ns3/point-to-point-module.h" #include
"ns3/ipv4-global-routing-helper.h" #include "ns3/internet-module.h" using namespace ns3; NS_LOG_COMPONENT_DEFINE ("TapCsmaUseBridgeExample"); int main (int argc,
char *argv[]) {
CommandLine cmd
(__FILE__);
cmd.Parse (argc, argv);
//
// We are interacting with the outside, real, world. This means we have to
// interact in real-time and therefore means we have to use the
real-time
// simulator and take the time to calculate checksums.
//
GlobalValue::Bind ("SimulatorImplementationType",
StringValue ("ns3::RealtimeSimulatorImpl"));
GlobalValue::Bind ("ChecksumEnabled",
BooleanValue (true));
//
// Create two ghost nodes.
The first will represent the virtual machine host
// on the left side of the network; and the second will represent the
VM on
// the right side.
//
NodeContainer csma1Nodes;
csma1Nodes.Create (2);
NodeContainer p2pNodes;
p2pNodes.Add (csma1Nodes.Get (1));
p2pNodes.Create(1);
NodeContainer csma2Nodes;
csma2Nodes.Create(1);
csma2Nodes.Add (p2pNodes.Get (1));
PointToPointHelper pointToPoint;
pointToPoint.SetDeviceAttribute ("DataRate", StringValue
("5Mbps"));
pointToPoint.SetChannelAttribute
("Delay", StringValue ("2ms"));
NetDeviceContainer p2pDevices;
p2pDevices = pointToPoint.Install
(p2pNodes);
CsmaHelper csma;
csma.SetChannelAttribute
("DataRate", StringValue
("100Mbps"));
csma.SetChannelAttribute
("Delay", TimeValue (NanoSeconds
(6560)));
NetDeviceContainer csma1Devices;
NetDeviceContainer csma2Devices;
csma1Devices = csma.Install
(csma1Nodes);
csma2Devices = csma.Install
(csma2Nodes);
Ptr<RateErrorModel>
em = CreateObject<RateErrorModel> ();
em->SetAttribute ("ErrorRate", DoubleValue (0.03));
em->SetAttribute
("ErrorUnit", StringValue
("ERROR_UNIT_PACKET"));
p2pDevices.Get (1)->SetAttribute ("ReceiveErrorModel", PointerValue
(em));
InternetStackHelper stack;
stack.Install
(csma1Nodes);
stack.Install
(csma2Nodes);
Ipv4AddressHelper address;
address.SetBase
("10.1.1.0", "255.255.255.0");
Ipv4InterfaceContainer csma1Interfaces; csma1Interfaces = address.Assign (csma1Devices);
address.SetBase
("10.1.2.0", "255.255.255.0");
Ipv4InterfaceContainer p2pInterfaces;
p2pInterfaces = address.Assign
(p2pDevices);
address.SetBase
("10.1.3.0", "255.255.255.0");
Ipv4InterfaceContainer csma2Interfaces;
csma2Interfaces = address.Assign
(csma2Devices);
Ipv4GlobalRoutingHelper::PopulateRoutingTables
();
//TapBridgeHelper tapBridge;
//tapBridge.SetAttribute ("Mode", StringValue ("ConfigureLocal"));
//tapBridge.SetAttribute ("DeviceName", StringValue
("thetap"));
//tapBridge.Install (csma1Nodes.Get (0),
csma1Devices.Get (0));
//
// Use the TapBridgeHelper to connect to the
pre-configured tap devices for
// the left side. We go
with "UseBridge" mode since the CSMA
devices support
// promiscuous mode and can therefore make it appear that the bridge
is
// extended into ns-3. The
install method essentially bridges the specified
// tap to the specified CSMA device.
//
TapBridgeHelper tapBridge;
tapBridge.SetAttribute ("Mode", StringValue ("UseBridge"));
tapBridge.SetAttribute ("DeviceName", StringValue
("tap-left"));
tapBridge.Install (csma1Nodes.Get (0),
csma1Devices.Get (0));
// // Connect the right
side tap to the right side CSMA device on the right-side
// ghost node.
//
tapBridge.SetAttribute ("DeviceName", StringValue
("tap-right"));
tapBridge.Install (csma2Nodes.Get (0),
csma2Devices.Get (0));
//
// Run the simulation for ten minutes to give the user time to play
around
//
Simulator::Stop (Seconds (1000.));
Simulator::Run ();
Simulator::Destroy (); } |
Execution
![]()
Setup network namespace.

Download foreman_cif.yuv
Encode the video.

Execute the ns3 simulation.

Open another terminal. (For video receiver)

Open another terminal (For video sender)
![]()
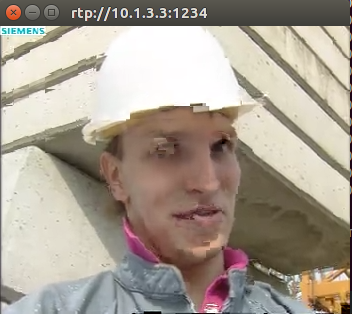
Then you can see the received video.
Last
Modified: 2022/2/26 done
[Author]
Dr. Chih-Heng Ke
Department of Computer
Science and Information Engineering, National Quemoy University, Kinmen,
Taiwan
Email: smallko@gmail.com