myEvalSVC-NS3 (performance evaluation framework for scalable video contents in NS3 environment)
Based on my previous work (myEvalSVC and myEvalSVC-mininet) and evalvid-ns3, I have implemented the myEvalSVC-ns3 framework. In order for researchers to do the scalable video performance evaluation, I prepare a VM.
All are included (ns-3-allinone/ns-3.34, JSVM, svef-1.5, and an example from temporal video encoding to video transmission over lossy P2P link in NS3). You can download the VM from here. (login name and password is user/user)
If you are using this work, please cite the following paper.
C. Ke, "myEvalSVC: an Integrated Simulation Framework for Evaluation of H.264/SVC Transmission," KSII Transactions on Internet and Information Systems, vol. 6, no. 1, pp. 379-394, 2012. DOI: 10.3837/tiis.2012.01.021.
Simulation environment
N0(client)---(p2p link)-----N1 (server)
Video server starts at 9 seconds and video client starts at 10 seconds. The client will send a request to packet to server first. Then video server will start to transmit the video packets to client.
Steps to do the evaluation.
1. Video Encoding. (Check the temporal_main.cfg and temporal_layer0.cfg under evalsvc-ns3 folder)

After encoding, you can find temporal.264 and temporal_encoding.txt. You can open the temporal_encoding.txt to know the encoding process.
2. Decode the temporal.264 and record the decoding process into temporal_originaldecoderoutput.txt. We need some information in it.
![]()
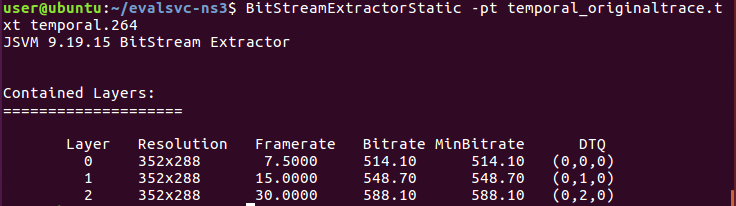
3. Use the JSVM BitStreamExtractor to generate the original NALU trace file (temporal_originaltrace.txt)
4. Use f-nstamp to add the frame-number in temporal_originaltrace.txt. (It will generate temporal_originaltrace-frameno.txt)
![]()
5.
Prepare
the sending trace needed by NS3 with the aid of prepare_ns3sendtrace.awk. (put the result in ns3send-ns3)
![]()
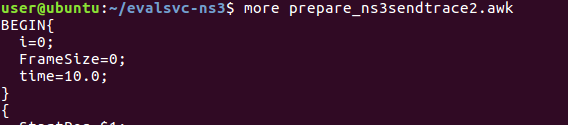
6.
Prepare
the sending trace needed for post-processing with the aid of
prepare_ns3sendtrace2.awk. (put the result in ns3send)
![]()
Note. In prepare_ns3sendtrace2.awk (time=10.0 means that
the client starts at 10 seconds.)
7.
Copy
the ns3send-ns3 to ns-3-allinone/ns-3.34
![]()
8. Run the ns3 simulation
9. After simulation, you will get the receiver trace file. Copy it back to evalsvc-ns3
![]()
10. Post-Processing.


![]()
![]()
![]()
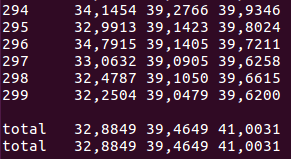
So you can get the average PSNR is 32.8849. (You can change the error rates in evalsvc-client-server.cc to see the different results.

Last
modified: 2022/1/28
Contact
Information
Dr. Chih-Heng Ke
Department
of Computer Science and Information Engineering, National Quemoy University,
Taiwan
Email: smallko@gmail.com