How to do H.264 SVC
transmission simulations?
Introduction
Based on SVEF (Scalable Video-streaming Evaluation Framework [1]), I extended this framework to NS2 simulation environment. The integrated evaluation framework is called myEvalSVC. Therefore, users can evaluate their proposed network architectures or protocols for H.264 SVC transmission more realistically in NS2. Users can start by encoding raw YUV video with different encoding parameters (temporal encoding, spatial encoding, SNR encoding, or combined encoding). After that, BitStreamExtractor (provided in JSVM [2]) and F-N Stamp (provided in SVEF [2]) are used to generate an original NALU Trace file. This file is then converted to ns2 send trace file via prepare_sendtrace.awk (provided by myEvalSVC). In NS2, an agent called myEvalSVC is used to read the converted ns2 send trace file and generates the corresponding packets in the designated time. Users can design their network architectures or protocols in NS2 and evaluate the performance of SVC transmission. In the receiver side, an agent called myEvalSVC_Sink is used to receive the SVC packets and record the related information, such as receiving time, packet size, frame number, and so on. This receiver trace file can be handled by Pe2edelay (provided by myEvalSV) to calculate the packet level end to end delay or to calculate the packet loss rate. This receiver trace file is also handled by prepare_receivedtrace1.awk (provided by myEvalSVC) and prepare_receivedtrace2.exe (provided by myEvalSVC) to generate the needed file format required by SVEF. This processed file is then fed into NALU FILTER (provided by SVEF) to generate the Filtered NALU Trace. In this process, too late frames or frames that cannot be decoded are eliminated. Following, the Filtered NALU Trace is sent to BitStreamExtractor (provided by JSVM) to generated the Filtered H.264 Video (Users can think that this file is corresponding to the real data gathered by the receiver side.) Finally, this Filtered H.264 Video is decoded by JSVM Decoder to generate the Filtered YUV Video. In order to compare the PSNR, the myfixyuv has to conceal the missing frames by copying the previous frame. Missing frames can be identified through the frame-number field of the Filtered NALU trace.
Basically, it is a not easy job. Too many things must be known before doing simulation. So I suggest that interested users should read some tutorial papers about H.264 SVC first. Then read JSVM software manual [3] to understand the meaning of each encoding parameters. Following, please read [4] more carefully. Finally try to do each steps provided in this website. Also, add the following into your references.
C. H. Ke, " myEvalSVC: an Integrated Simulation Framework for Evaluation of H.264/SVC Transmission ", KSII Transactions on Internet and Information Systems, vol. 6, no. 1, pp. 378-393, Jan. 2012 (SCI)
[Fix some bugs: 2014/06/16]
Please download this file (myevalsvc_patch.rar). Decompress this file and copy the agent.cc, agent.h, and packet.h to replace the ones under ns-allinone-2.35/ns-2.35/common. Copy the myevalsvc.cc to replace the one under ns-allinone-2.35/ns-2.35/myvideo. Recompile the ns with the command "make".
Hope you can enjoy the myEvalSVC.
Steps
An example for H.264/SVC video transmission over IEEE 802.11 networks. There are three nodes, i.e. node 0, node 1, and node 2. Node 0 transmits H.264/SVC video and CBR with 0.2 Mbps to Node 1 ,and CBR with 0.3 Mbps and FTP to Node 2, respectively. The data rate is set to 1Mbps, and basic rate is also set to 1Mbps.
1. Encoding Raw YUV video
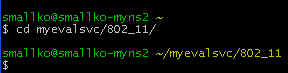
1.1 click the cygwin_new icon on the desktop.

1.2 Change the path to myevalsvc/802_11
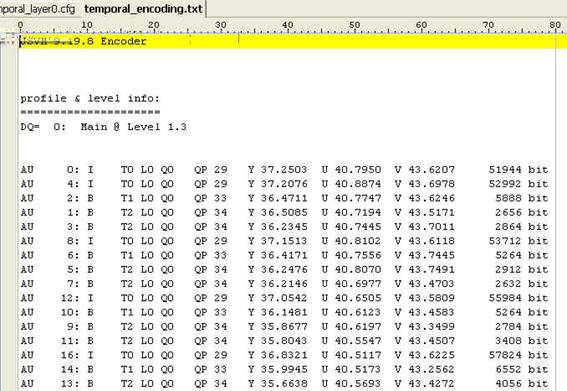
1.3 Use the following two files to do temporal encoding. (You can encode by setting different parameters after you are familiar with [3]. In this example, the base layer is in 7.5 frames/second format (identified by TID:0). The base layer + enhancement layer1 (identified by TID:1) will produce 15 frames/second video. The base layer + enhancement layer 1 and 2 (Identified by TID:2) will produce 30 frame/second video.) Refer to [3], you can understand the meaning of each encoding parameter.
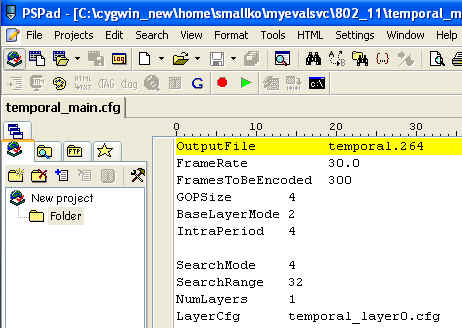
1.4 You can open temporal_main.cfg. (Choose the PSpad editor to open this file.)
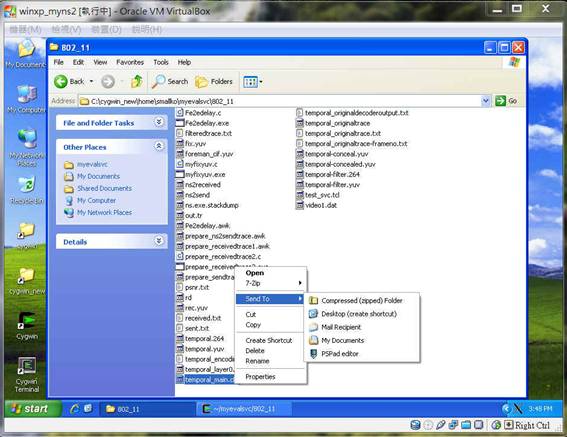
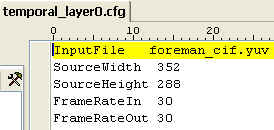
with the same method to open temporal_layer0.cfg.
1.5 Encode the raw YUV with the temporal_main.cfg. (This step may take some time. Be patient !!!)
![]()
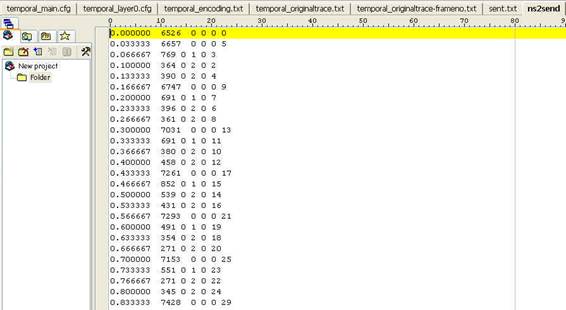
1.6 After encoding, you can find temporal.264 and temporal_encoding.txt. You can open the temporal_encoding.txt to know the encoding process.
2. Decode the temporal.264 and record the decoding process into temporal_originaldecoderoutput.txt. We need some information in it.
![]()
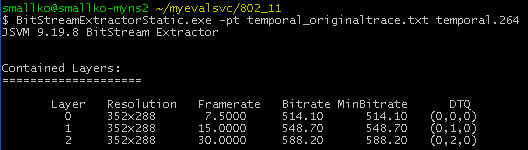
3. Use the JSVM BitStreamExtractor to generate the original NALU trace file (temporal_originaltrace.txt)
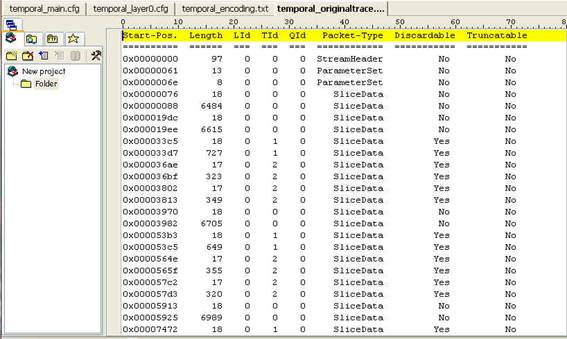
The part of content in temporal_originaltrace.txt looks like
4. Use f-nstamp to add the frame-number in temporal_originaltrace.txt. (It will generate temporal_originaltrace-frameno.txt)
![]()

p.s. the last second field is frame-number and the last one is used to save the sending time or receiving time in the future.
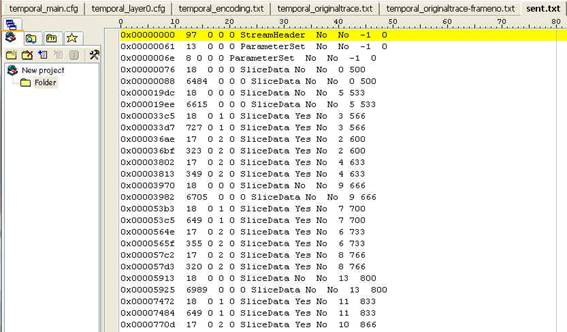
5. Prepare the sending trace needed by SVEF with the aid of prepare_sendtrace.awk.
|
#This file is prepare_sendtrace.awk BEGIN{ time=500; # It means that this SVC
video starts transmission at 0.5 second.
# If you want to start transmission at 1.0 second, change the value to
1000. i=0; } { if($6=="SliceData"){ printf("%s\t%s\t%s\t%s\t%s\t%s\t%s\t%s\t%s\t%ld\n",$1,$2,$3,$4,$5,$6,$7,$8,$9,time); if(i==0) { i=1; } else { time+=1000.0/30.0; i=0; } } else { printf("%s\t%s\t%s\t%s\t%s\t%s\t%s\t%s\t%s\t%s\n",$1,$2,$3,$4,$5,$6,$7,$8,$9,0); } } END{ } |
![]()
After executing this command, you will find sent.txt.
6. Prepare the NS2 sending trace needed by myEvalSVC agent with the aid of prepare_ns2sendtrace.awk.
|
BEGIN{ i=0; FrameSize=0; time=0.0; // just set 0.0 here. The
actual start transmission time depends on TCL setting. } { StartPos=$1; Length=$2; LId=$3; TId=$4; QId=$5; PacketType=$6; Discardable=$7; Truncatable=$8; FrameNo=$9; SentTime=$10; if(i==0 && PacketType=="SliceData") { FrameSize=(Length+12); i=1; }else if (i==1 && PacketType=="SliceData") { FrameSize+=(Length+12); printf("%f\t%s\t%s\t%s\t%s\t%s\n", time, FrameSize, LId, TId, QId, FrameNo); time+=1.0/30.0; i=0; FrameSize=0; } } END{ } |
![]()
After executing this command, you will find ns2send.
7. NS2 Simulation
7.1 Simulation Script: test_svc.tcl
|
#=================================== # Simulation parameters setup #=================================== set val(chan) Channel/WirelessChannel ;# channel type set val(prop) Propagation/TwoRayGround ;# radio-propagation model set val(netif) Phy/WirelessPhy ;# network interface type set val(mac) Mac/802_11 ;# MAC type set val(ifq) Queue/DropTail/PriQueue ;# interface queue type set val(ll) LL ;# link layer type set val(ant) Antenna/OmniAntenna ;# antenna model set val(ifqlen) 50 ;# max packet in ifq set val(nn) 3 ;# number of mobilenodes set val(rp) DSDV ;# routing protocol set val(x) 400 ;# X dimension of topography set val(y) 500 ;# Y dimension of topography set val(stop) 50.0 ;# time of simulation end Mac/802_11 set dataRate_ 1Mb Mac/802_11 set basicRate_ 1Mb #=================================== # Initialization #=================================== #Create a ns simulator set ns [new Simulator] #Setup topography object set topo [new Topography] $topo load_flatgrid $val(x) $val(y) create-god $val(nn) #Open the NS trace file set tracefile [open out.tr w] $ns trace-all $tracefile set chan [new $val(chan)];#Create wireless channel #=================================== # Mobile node parameter setup #=================================== $ns node-config -adhocRouting $val(rp) \ -llType $val(ll) \ -macType $val(mac) \ -ifqType $val(ifq) \ -ifqLen $val(ifqlen) \ -antType $val(ant) \ -propType $val(prop) \ -phyType $val(netif) \ -channel $chan \ -topoInstance $topo \ -agentTrace ON \ -routerTrace OFF \ -macTrace ON \ -movementTrace OFF #=================================== # Nodes Definition #=================================== #Create 3 nodes set n0 [$ns node] $n0 set X_ 200 $n0 set Y_ 400 $n0 set Z_ 0.0 $ns initial_node_pos $n0 20 set n1 [$ns node] $n1 set X_ 300 $n1 set Y_ 400 $n1 set Z_ 0.0 $ns initial_node_pos $n1 20 set n2 [$ns node] $n2 set X_ 200 $n2 set Y_ 350 $n2 set Z_ 0.0 $ns initial_node_pos $n2 20 #=================================================== set max_fragmented_size 1500 #8 bytes:UDP header, 12 bytes: Layer-5 header set packetSize [expr $max_fragmented_size+20] set src_udp1 [new Agent/UDP] $src_udp1 set packetSize_ $packetSize set dst_udp1 [new Agent/myEvalSVC_Sink] $ns attach-agent $n0 $src_udp1 $ns attach-agent $n1 $dst_udp1 $ns connect $src_udp1 $dst_udp1 $dst_udp1 set_filename rd set original_file_name ns2send set trace_file_name video1.dat set original_file_id [open $original_file_name r] set trace_file_id [open $trace_file_name w] set pre_time 0 while {[eof $original_file_id] == 0} { gets $original_file_id current_line
scan $current_line "%f%d%d%d%d%d" t_ size_ lid_ tid_ qid_ fno_ set time [expr int(($t_ - $pre_time)*1000000.0)]
if { $tid_ == 0 } { set prio_p 1 }
if { $tid_ == 1 } { set prio_p 1 }
if { $tid_ == 2 } { set prio_p 1 }
puts $trace_file_id "$time $size_ $lid_ $tid_ $qid_ $fno_ $prio_p $max_fragmented_size" set pre_time $t_ } close $original_file_id close $trace_file_id set trace_file [new Tracefile] $trace_file filename $trace_file_name set video1 [new Application/Traffic/myEvalSVC] $video1 attach-agent $src_udp1 $video1 attach-tracefile $trace_file #=================================================== set src_udp2 [new Agent/UDP] $src_udp2 set packetSize_ 1500 $src_udp2 set prio_ 2 set dst_udp2 [new Agent/Null] $ns attach-agent $n0 $src_udp2 $ns attach-agent $n1 $dst_udp2 $ns connect $src_udp2 $dst_udp2 set traffic0 [new Application/Traffic/CBR] $traffic0 set packetSize_ 1000 $traffic0 set rate_ 0.2Mb $traffic0 set random_ true $traffic0 attach-agent $src_udp2 set src_tcp1 [new Agent/TCP/Reno] $src_tcp1 set prio_ 2 set dst_tcp1 [new Agent/TCPSink] $ns attach-agent $n0 $dst_tcp1 $ns attach-agent $n2 $src_tcp1 set ftp1 [new Application/FTP] $ftp1 attach-agent $src_tcp1 $ns connect $src_tcp1 $dst_tcp1 #=================================================== set src_udp3 [new Agent/UDP] $src_udp3 set packetSize_ 1500 $src_udp3 set prio_ 3 set dst_udp3 [new Agent/Null] $ns attach-agent $n0 $src_udp3 $ns attach-agent $n2 $dst_udp3 $ns connect $src_udp3 $dst_udp3 set traffic1 [new Application/Traffic/CBR] $traffic1 set packetSize_ 1000 $traffic1 set rate_ 0.3Mb $traffic1 set random_ true $traffic1 attach-agent $src_udp3 $ns at 0.1 "$traffic0 start" $ns at 0.1 "$traffic1 start" $ns at 0.1 "$ftp1 start" $ns at 0.5 "$video1 start" $ns at 30.0 "$video1 stop" $ns at 30.0 "$traffic0 stop" $ns at 30.0 "$traffic1 stop" $ns at 30.0 "$ftp1 stop" #=================================== # Termination #=================================== #Define a 'finish' procedure proc finish {} { global ns tracefile namfile dst_udp1 $ns flush-trace close $tracefile $dst_udp1 closefile puts "simulation completed" exit 0 } for {set i 0} {$i < $val(nn) } { incr i } { $ns at $val(stop) "\$n$i reset" } $ns at $val(stop) "finish" $ns at $val(stop) "puts \"done\" ; $ns halt" $ns run |
7.2 Do the simulation.
7.3 After simulation, you will find rd (receiver trace file).
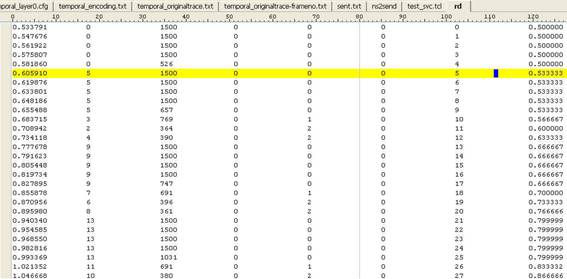
p.s. The first field is receiving time, the second is frame-number, the third is packet size, the fourth is lid, the fifth is tid, the sixth is qid, the seventh is packet id, and the last one is sending time.
8. Post Processing
8.1 If you want to get the packet end to end delay, you can use Pe2edelay.awk to get this performance matrix.
|
BEGIN{ i=0; } { receivedtime=$1; frameno=$2; framesize=$3; lid=$4; tid=$5; qid=$6; pktid=$7; sendtime=$8; Pe2edelay[pktid]=receivedtime-sendtime; if(pktid>i) i=pktid; } END{ for(j=0;j<i;j++) if(Pe2edelay[j]>0) printf("%-16d %-16f\n", j, Pe2edelay[j]); } |
![]()
|
0 0.033067 1 0.047104 2 0.061322 3 0.075379 4 0.082464 ………………………………………………………………………….. |
p.s. the first field is packet id, and the second is the packet end to end delay (in second).
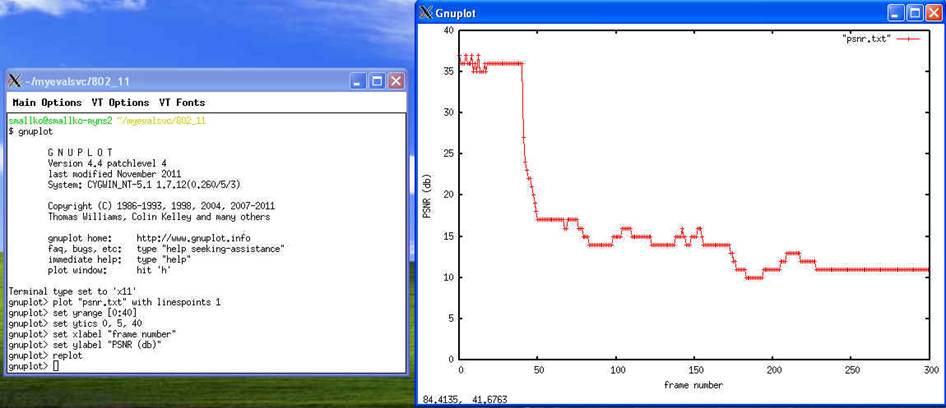
8.2 You can use the following command to draw the figure for packet end to end delay.
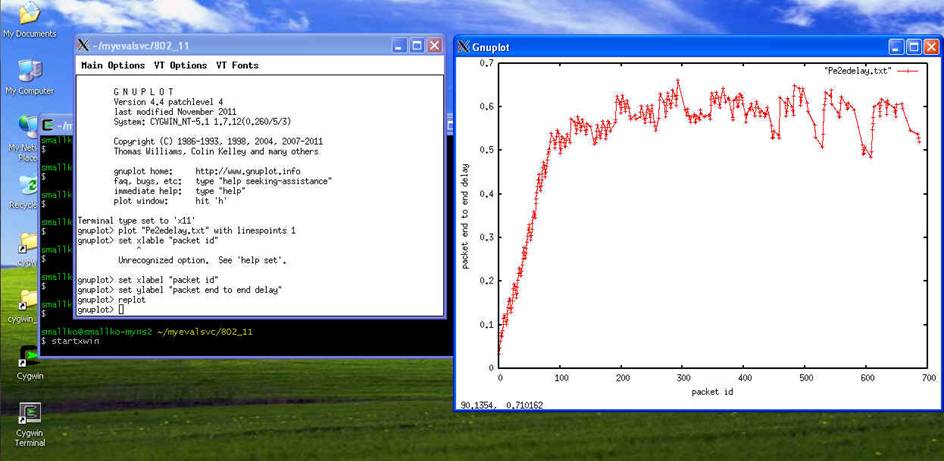
8.3 Convert the rd file to the format required for SVEF file.
![]()
![]()
After these two steps, you can get received.txt. This file is the receiver trace file required for SVEF.
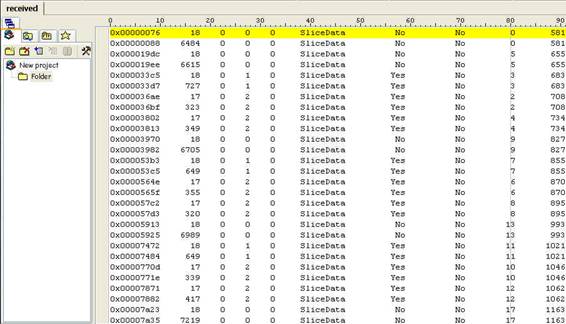
The last field is the frame receiving time.
8.4 Based on temporal_originaltrace-frameno.txt and received file, nalufilter will discard too late frames and frames that cannot be decoded due to frame dependencies.

5000 means 5000 miliseconds for play out buffer. 30 means 30 frames per second for the processed video.
After execution, you can see that 312 packets are deleted due to unsatisfied dependencies.
8.5 The current version of JSVM (9.19.8) cannot decode video streams affected by out of order, corrupted, or missing NALUs. Therefore, SVEF uses filtered packet trace file to extract the corresponding packets in original h.264 video file by means of BitStreamExtractorStatic. (You can think that processed video file corresponds to the actually useful data received at the receiving side.)
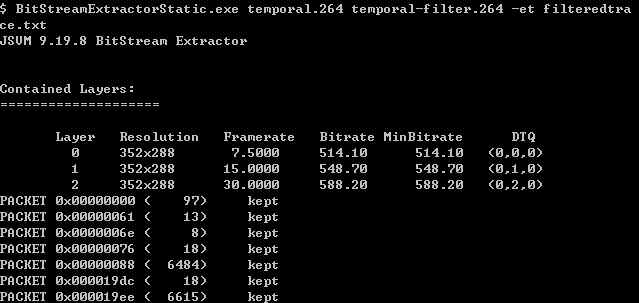
………………………………………………………………………………

From above figure, you can see which frame is kept and which frame is discarded.
8.6 Decode the temporal-filtered.264 file.
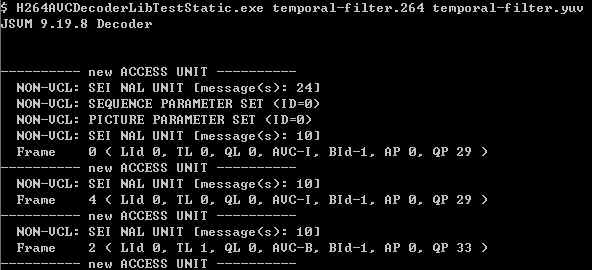
………………………………………………………………………………………………………………………………
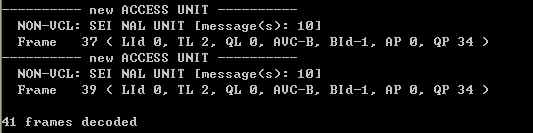
Only 41 frames can be decoded.
8.7 We need the same number of video frames when we want to calculate the PSNR of original YUV and receiving YUV file. So we need to conceal the missing frames by copying the previous frame.

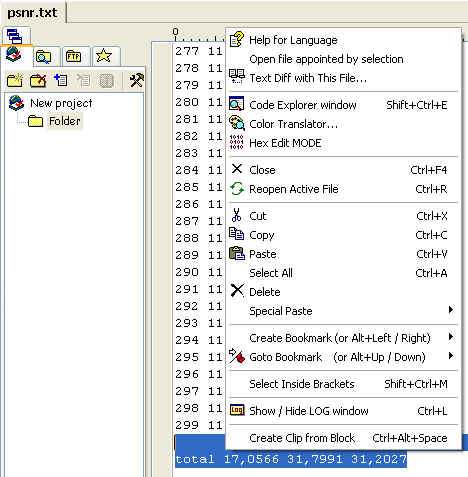
8.8 Now you can compare the PSNR.
![]()
The average Luminance PSNR is 17.0566.
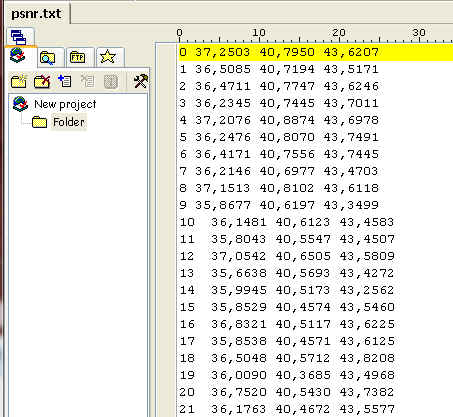
The first field is frame number, the second is Y-PSNR(luminance), the third is U-PSNR, and the fourth is V-PSNR.
If you want to draw the PSNR values, please remove the last two files in psnr.txt.
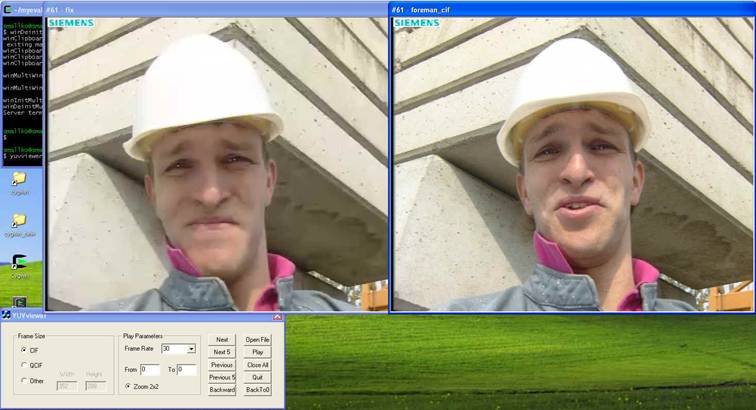
9. Finally you can run yuvviewer to visually compare the performance.
![]()
References
1. SVEF (http://svef.netgroup.uniroma2.it/)
2. SVC Reference Software (http://ip.hhi.de/imagecom_G1/savce/downloads/SVC-Reference-Software.htm
3. JSVM Software manual (http://evalsvc.googlecode.com/files/SoftwareManual.doc)
4. “SVEF: an Open-Source Experimental Evaluation Framework for H.264 Scalable Video Streaming” (http://zioproto.ninux.org/download/publications/svef.pdf)
Last modified: 2012/04/18
Contact Information
Dr. Chih-Heng Ke
Department of Computer Science and Information Engineering, National Quemoy University, Taiwan
Email: smallko@gmail.com